
Exterior New Wall Construction
Design and Application
Details and Instructions
Preparation
Be sure that the walls are smooth, without protuberances. Nail ends or points should be removed or pounded flush.
Building paper - An ASTM Type 15 felt or other code approved moisture barrier should be applied over the sheathing. Apply it horizontally, with a staple gun, starting at the base of the wall, with a 2" horizontal overlap with each succeeding course, and a 6" overlap vertically when starting a new roll. Wrap the paper 4" each way around both inside and outside corners.
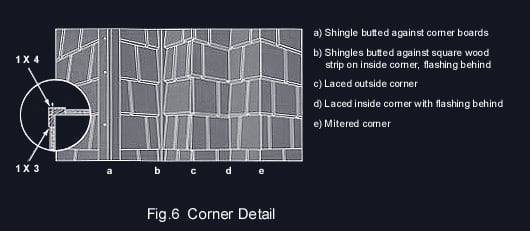
Corner Boards - Install corner boards (Fig. 6) at this time.
Flashing - Flashings and caulking over doors, windows, and other points of potential water entry should be in accordance with good building practice.
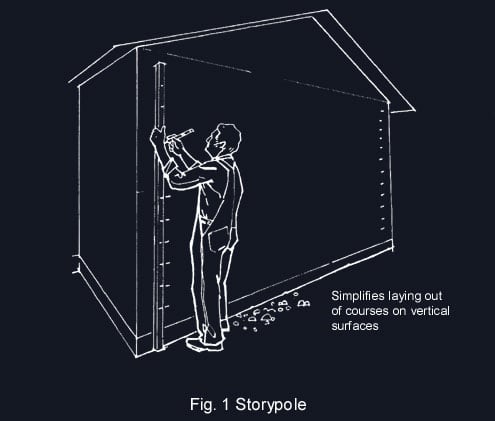
Laying Out -Determine the number of courses by measuring the height of the wall at the lowest part of the foundation, from a point 1" below the top of the foundation, to the top of the wall. Divide the height into equal parts, corresponding closely to the recommended weather exposure, but not exceeding the maximum recommended. Transfer this measurement and the number of courses to a storypole (Fig. 1), to lay out courses on all other walls. Whenever possible butt lines should align with tops or bottoms of windows or other openings, and for appearance the exposure of the final course at the top should match those below.
Single Coursing
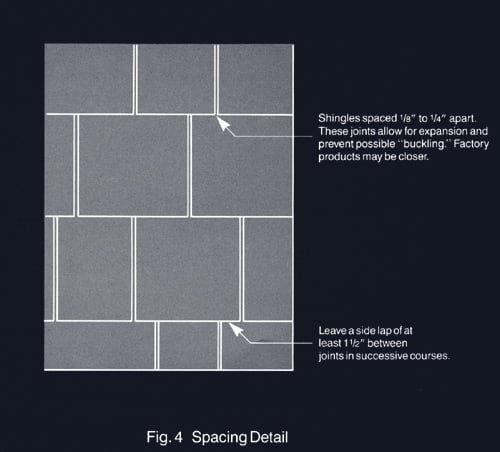
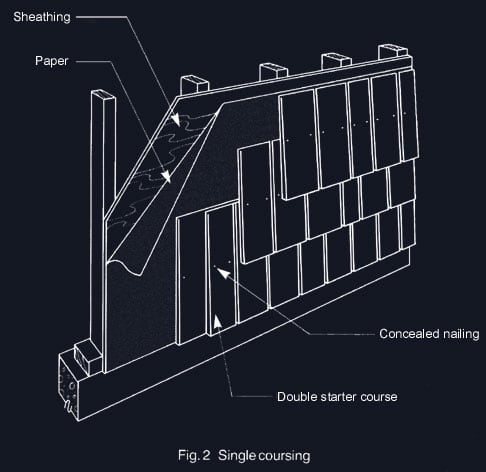
Double the starting course at the base of the wall (Fig. 2). Apply with 1/8" to ¼" vertical space between shingles, giving a pronounced individual effect to each shingle and allowing for expansion. Primed shingles can be butted close together. A natural shingle, if applied with tight joints, should be primed or stained soon after application to prevent buckling due to expansion caused by moisture absorption (Fig. 4).
Offset the side joints in any one course at least 1½" over the joints in courses (Fig.4)
Use a straight edge, nailing it lightly to the wall with the edge at the butt line (to keep courses straight and level). Check for level every 3 or 4 courses.
This wall application features concealed nailing (Fig. 2), with nails driven approximately 1" above the butt line of the succeeding course. For shingles up to 8" wider, place two nails in each shingle ¾" from each edge. With shingles wider than 8" drive two additional nails approximately 1" apart near the center.
Because shingles vary in width there should be little waste. At corners, or at door or window frames, you may have to trim selected shingle slightly.
Double Coursing
To obtain an attractive wall characterized by wide weather exposures and deep shadow lines, shingles and shakes can be applied double coursed. This method offers economy because of the wide exposures of the outer course and the use of less expensive undercoursing shingles for the under layer (Fig. 3).
The maximum weather exposures recommended for #1 grade shingles are 12" for 16" shingles, 14" for 18" shingles, and 16" for 24" shingles. With shakes, the #1 grade 18" lengths can be laid at weather exposures up to 14" and 24" shakes up to 18."
In double coursing, the bottom or starter course is laid triple with two undercourse shingles or one undercourse shingle over a wood lath and then the outer course. This gives the bottom course the same slant as succeeding courses. Outer-courses are applied ½", lower than the undercourse (Fig. 3). A straight edge can be used to facilitate placement and nailing of both the undercourse and exposed course.
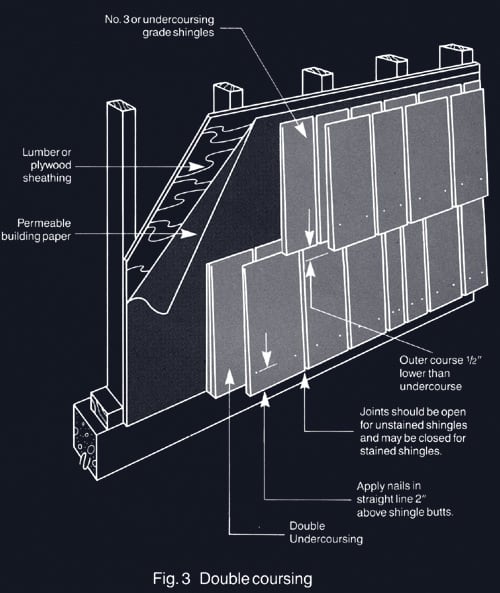
Undercourse shingles are fastened at the top with one nail or staple in the center The exposed shingle or shake is face-nailed with two casing-type nails, driven about 2" above the butt line, ¾" from each edge. With shingles wider than 8" drive two additional nails approximately 1" apart near the center.
Three remanufactured products are popular in double course application. The first is Heritage rebutted-rejointed shingles in 16" and 18" lengths, machine trimmed for parallel edges with butts sawn at right angles, for application where snugly fitting joints are desired to give a clapboard look. Also available with smooth-sanded face.
The second is Heritage sidewall shakes, manufactured from standard shingles and having striated faces and parallel edges. They are available prime coated for finish treatment after application.
The third is Heritage True-Edge Straight-Split shakes, 18" long, with parallel edges and rather than tapered have the same thickness throughout. All of these can be applied with closed joints to form a continuous appearance, and as double coursed have distinctive shadow line.
